Print Quality Test — What Your Printer Self-Test Misses
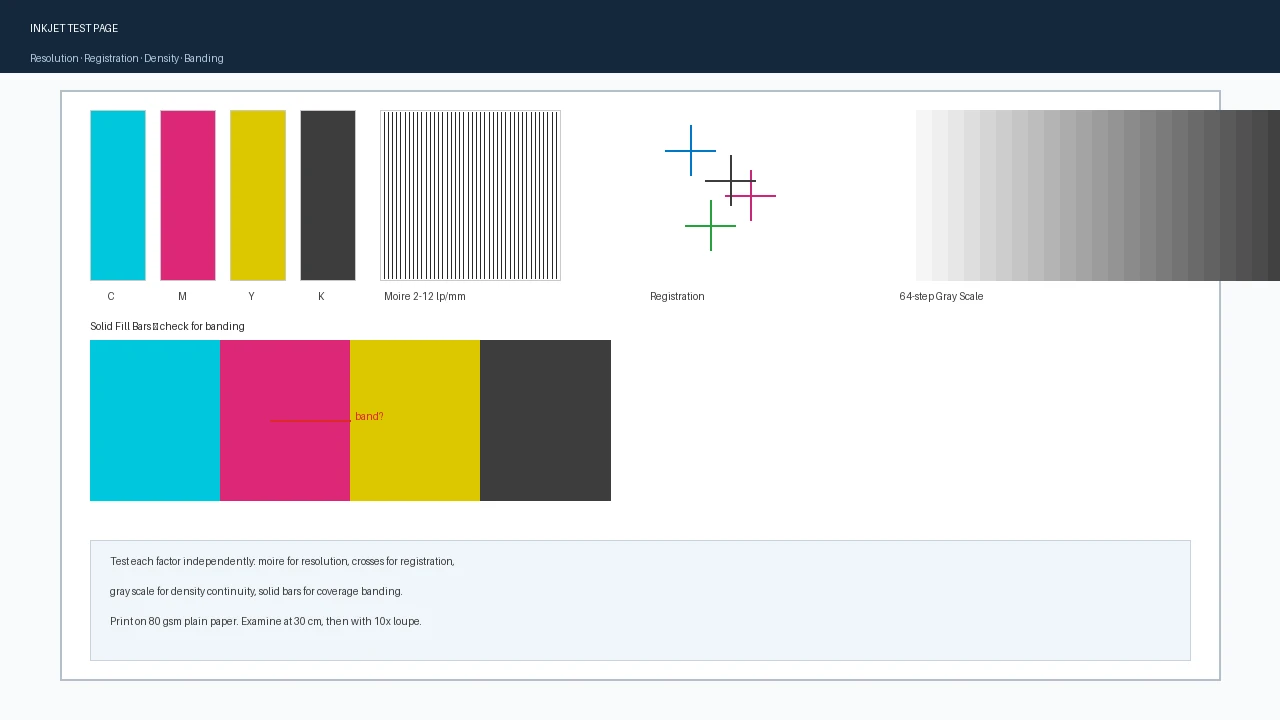
A printer self-test page is a functional check, not a comprehensive diagnostic tool. True print quality depends on four measurable factors — resolution, registration accuracy, toner or ink density, and banding — many of which a basic manufacturer self-test does not measure. The tool on this site generates targeted test patterns — a 21-step grayscale gradient, fine lines at 0.5, 1 and 2 pt spacing, alignment crosshairs, and CMY registration marks — for visual inspection, but doesn't automatically calculate registration offset, line-pair resolution, or gray-level values. This guide gives you those patterns, common reference thresholds to judge them by, and a decision framework to determine when to clean, refill, or send for service.
Your printer says READY. It just produced a full-color self-test page with crisp blocks of cyan, magenta, yellow, and black. And yet the documents coming out of it are subtly wrong: fine text that fringes into color, gradients that step instead of blend, horizontal stripes you only notice when you hold a page at an angle.
That paradox is the subject of this guide. A self-test page that prints successfully tells you exactly one thing — the printer can lay down toner or ink in all four colors. It tells you nothing about whether those colors align to each other, whether the printer can reproduce fine detail, whether tonal transitions are smooth, or whether the imaging system is wearing out. Manufacturer self-tests are built to confirm function, not to measure quality.
Real print quality comes down to four measurable factors: resolution — how fine a line the printer can reproduce; registration — how precisely the four color layers align; density — how smoothly the printer transitions from white to black; and banding — the presence of periodic or random stripes that shouldn’t exist.
Each factor has a targeted test pattern you can print in about a minute, and each can point to a likely failure mode. This guide gives you the patterns, the thresholds to judge them by, and a decision tree for what to do with the results — and a printer test page bundles the patterns into one sheet you can print in about a minute. The thresholds and diagnostic cues throughout are common reference values drawn from general experience, not universal specifications; actual results depend on your printer model, paper type, driver settings, and consumable condition. Visual inspection on this site is a screening tool, not a substitute for the manufacturer’s calibration page or professional service.
Why the self-test is not a diagnostic
Manufacturer self-test pages are designed around the minimum question the hardware can answer reliably: can each color fire, and does a page come out? They prioritize confirming that the device can produce output in all four colors, because that is the question most relevant to a factory shipping check and a user’s first setup. The coverage of quality dimensions — registration accuracy, density continuity, effective resolution — is therefore limited. That is a functional check, not a quality check. The difference is the same reason a car’s dashboard “engine running” light tells you nothing about whether the tires are aligned or the brakes are fading. A self-test prints solid color blocks, and a block has no edges to misalign. Off by half a millimeter and the block still looks correct. But the same printer produces fine text with a cyan halo because one color layer landed slightly to the right. That offset is invisible on the self-test and obvious on your next invoice. The same logic applies to gray scale. A self-test gradient spans the full tonal range, but nobody at the factory evaluates it against a reference, and the user never compares it to anything. A worn drum or a clogged nozzle produces visible stripes on that gradient, and those stripes stay hidden until you print a photograph and see the ladder steps.
The four measurements that matter
Each factor has a targeted test pattern you can print in about a minute. These patterns catch failures that self-test pages often miss: a worn drum, for instance, may print solid colors cleanly while banding appears only in gradients — and no built-in page would reveal it, while the gray scale test shows the repeating bands in seconds.
Can Your Printer Print a Thin Line?
Printer resolution is the density of dots a print head or imaging system can place on the page, measured in dots per inch (dpi). It isn’t the same as image resolution, and the two are frequently confused: a 1200 dpi printer printing a 72 dpi image is limited by the image, not the printer. A fine-line test isolates what the printer itself can reproduce. Print a set of fine parallel black lines at increasing densities — 0.5 pt, 1 pt, and 2 pt line spacing are the three densities this site’s tool currently generates. At low density the lines print as separate strokes. As density increases, the printer’s dot size and positioning error cause the lines to blur together or break up. The density at which lines stop rendering as clean, separate strokes tells you whether thin lines render complete, broken, or merged on your printer, driver, and paper combination. It does not translate directly into the printer’s real DPI: browser print scaling, driver rasterization, paper spread, and magnification all intervene, so treat the result as a comparison between prints rather than a resolution measurement. The marketed dpi figure describes dot density, not guaranteed line-pair resolution; the real limit depends on the printer model, driver settings, paper type, and print mode. Whether the difference matters depends on what you print:
- Photographs and fine graphics: visible difference in smooth gradients and thin lines.
- Text below 4 points: 600 dpi produces noticeably softer edges than 1200 dpi.
- Normal body text read at 30 centimeters: the human eye can’t distinguish 600 dpi from 1200 dpi. The practical threshold: if you print fine art, small-format marketing materials, or documents with small fonts, 1200 dpi matters. For everyday documents and emails, 600 dpi is adequate — and printing everything at 1200 dpi consumes more toner and slows printing for no visible gain.
Do the Colors Line Up?
Registration accuracy measures how precisely the cyan, magenta, yellow, and black layers land on top of one another. On a laser printer, each color is applied by a separate imaging drum before fusing; on an inkjet, each color comes from a separate print head pass. Any drift in drum position, belt stretch, or head alignment shifts one or more colors by a fraction of a millimeter — invisible on large fields, and destructive to fine text. The crosshair test prints a series of alignment crosshairs and CMY registration marks: this site’s tool places black crosshair marks at the page corners and center, plus three separate CMY registration rings that you inspect for relative alignment. Print the pattern, then examine the crosshair intersections and the ring overlaps with a magnifier at reading distance. Full multi-color overprinted crosses would be a more rigorous test, but aren’t currently generated. What you are looking for:
- Color fringing: a magenta or cyan halo around black text and hairline rules.
- Misaligned edges: the arms of a cross that should form a single crisp line separate into four colored lines side by side.
- Direction bias: offsets pointing the same way across the page indicate mechanical drift — worn drum gears or belt stretch; offsets that vary by region suggest a skewed paper path or misaligned print head. The tolerance thresholds vary by printer model and technology. The crosshair pattern carries no measurement scale, so judge alignment relatively: if color fringing appears around body text or crosshair arms separate into colored lines, alignment has drifted enough to matter for that job. Commercial offset printing targets ±0.3 mm registration (ISO/IEC 12647-2), but consumer inkjet and laser printers are not held to that tolerance — run the printer’s own alignment routine first, and if it cannot restore clean registration, mechanical wear is worth considering.
Does Gray Look Gray?
Density is the printer’s ability to lay down a continuous range of tones from white to black, and the gray scale test is the most informative single page you can print. Generate a 21-step gradient — a strip of 21 rectangles stepping from pure white through intermediate grays to pure black — then step back to reading distance and watch the transition from one step to the next.
On a healthy printer, adjacent steps are barely distinguishable and the eye perceives a smooth ramp. On a failing printer, the ramp breaks into visible banding: discrete steps or stripes where several adjacent rectangles look identical, followed by a jump. The position of the defect along the gradient is the diagnostic:
Where banding appears offers a hint, not a fixed rule: mid-tone banding often relates to print head or imaging issues (inkjet nozzles, laser drum), dark-zone banding to consumable level, and light-zone banding to paper absorbency. But these zones overlap across causes, and a driver density setting can mimic any of them — use the zone as a starting point, then cross-check with the other tests before replacing anything.
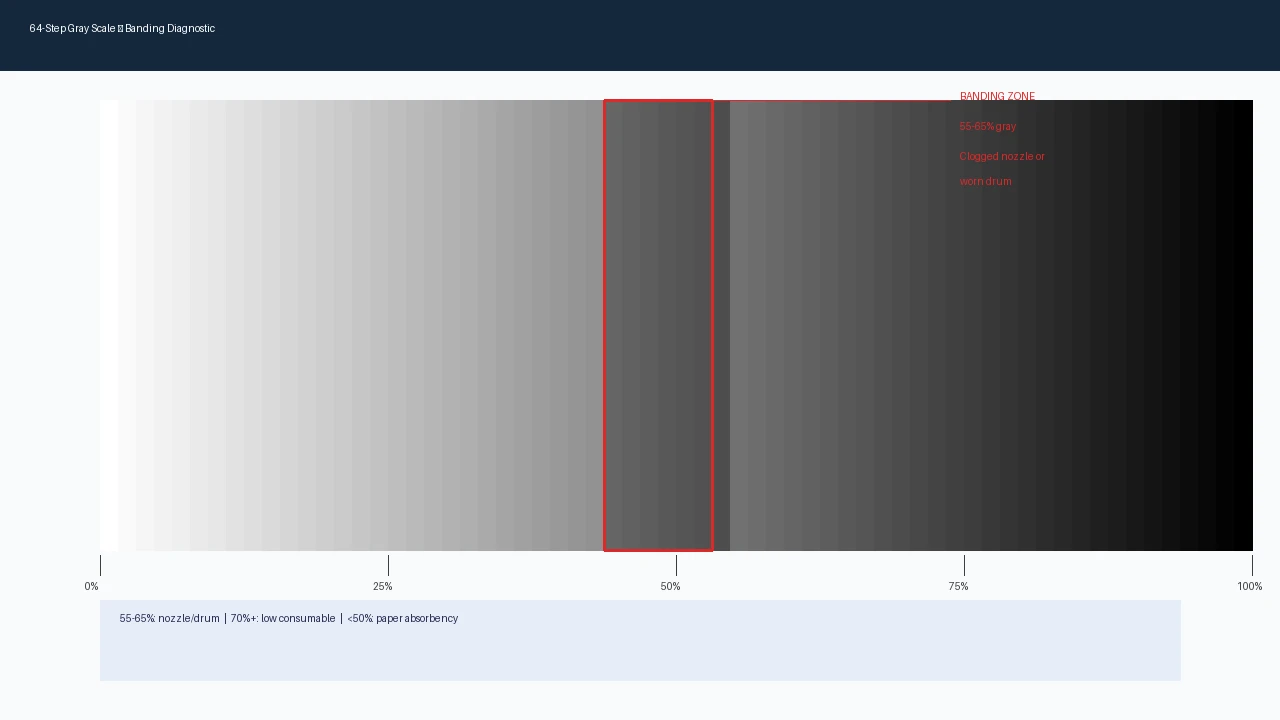 The step count matters. A 10-step gradient is too coarse to reveal banding, because the steps are large enough that unevenness is expected. At 21 steps, each step covers roughly five percent of the tonal range, and any failure in the imaging system produces a visible jump. For finer inspection a 64-step or higher gradient is preferable, though this site’s tool currently generates 21 steps as a quick visual screen.
Is Black Actually Black?
Banding is the umbrella term for unwanted stripes in solid fills, and the solid fill test — a page of solid color bars in each primary color plus black — makes it visible. Print the bars at full density, then examine them at a shallow angle against the light. Any variation in tone across a bar is banding, and the spacing and regularity of the stripes identify the cause. Inkjet banding appears as random horizontal lines whose spacing matches the print head pass width, typically 5–15 mm apart. The stripes are irregular: some faint, some strong, some doubled. This is a nozzle problem. Blocked or partially firing nozzles reduce coverage in each pass, and the printer’s compensation attempts produce the uneven bands. The pattern shifts slightly between jobs because droplet behavior changes as the head warms. Laser banding appears as repeating horizontal bands with regular spacing — often 10 to 12 centimeters apart, which matches the circumference of the photoconductor drum in many common models (HP’s support site; Canon’s support site). However, the exact spacing depends on the drum diameter of your specific printer. A scratch, nick, or wear spot on the drum surface can produce one band per drum rotation, but similar patterns can also originate from the charge roller, transfer roller, or fuser assembly. The drum circumference is a useful diagnostic clue but not the only possible cause. Two rules separate the causes:
- Bands spaced at the drum circumference (10–12 cm) on a laser printer: drum defect.
- Bands at irregular intervals that shift between jobs on an inkjet: nozzle issue.
- Bands appearing in every color at the same position: suspect the paper path or fuser, not the imaging system. One further distinction: banding in solid fills is a coverage problem, while banding in gradients is a tonal problem. They share the name and often the root cause, but the solid fill test isolates the coverage question cleanly.
Four Tests. Three Result Categories.
Once you have the test results, the path forward is mechanical. Match your observation to one of six branches: Three categories. Read them in order. Do not skip. Do not guess. Pattern first. Action second. The first is coverage: one color missing in vertical stripes points to a clogged nozzle, while all colors uniformly pale points to low consumable volume. Try the cleaning cycle before replacing anything. A driver density setting reset by an update can also produce banding across a tonal zone — check driver and firmware settings before assuming the hardware is at fault.
The second is alignment: registration drift that the built-in alignment routine corrects is normal wear. Drift that the routine cannot correct is mechanical — likely drum gears or belt stretch — and service is worth considering.
The third is repeating bands: drum-interval spacing on a laser printer points to a drum defect; random or shifting lines on an inkjet point to nozzles. Measure the band spacing first on any laser — if it matches the drum circumference, a drum swap is worth trying. But similar patterns can also come from the charge roller, transfer roller, or fuser, so confirm before replacing anything.
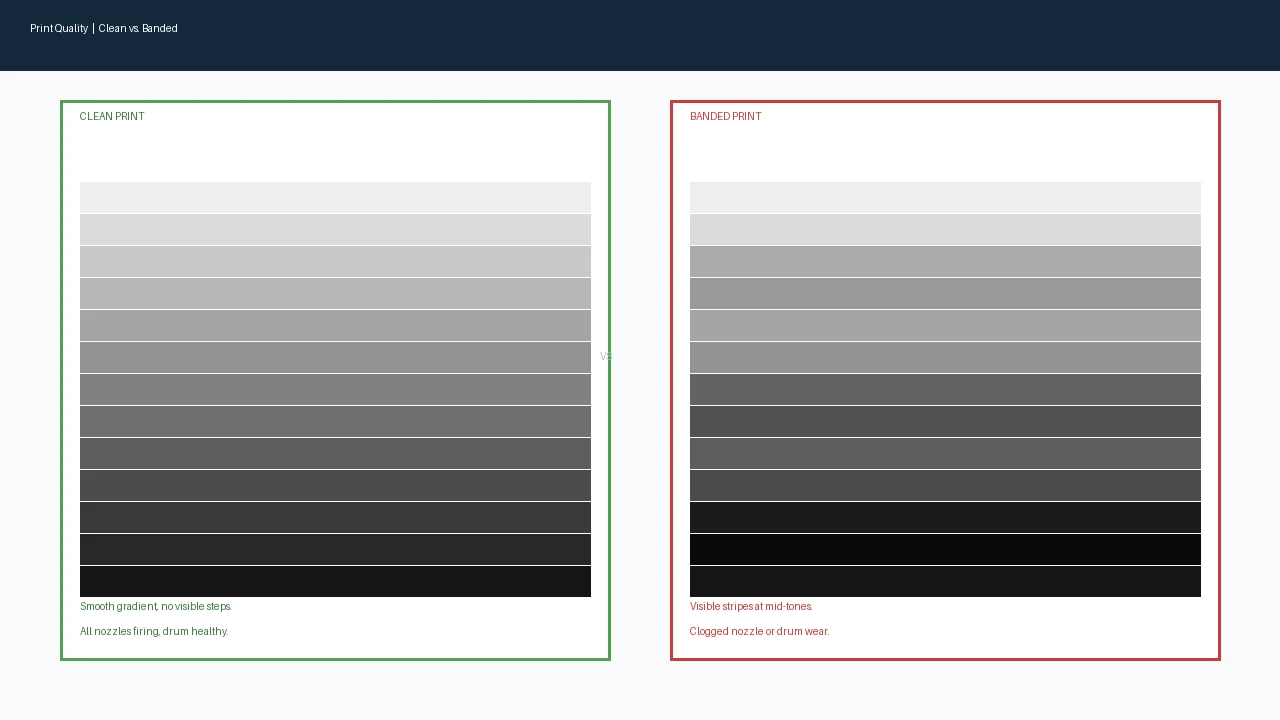 The order matters as much as the branch: test first, then replace consumables. Re-test after every fix: a single cleaning cycle that restores one color but reveals a second failing nozzle is a different diagnosis than the one you started with. The decision tree is iterative, not one-shot.
Inkjet versus laser: different failure modes
The four test patterns work on both technologies, but they answer different questions on each. A pattern that isolates a consumable problem on an inkjet isolates a mechanical problem on a laser, and misreading which is which is the most common cause of wasted money on replacement parts. Inkjet printers fail primarily through their consumables. The print head is the entire imaging system: nozzle clogs, dried ink, and air bubbles account for the majority of quality failures, and all of them show up in the same tests. The moiré test loses fine lines because partially blocked nozzles can’t place the small dots fine lines require. The gray scale test bands in the mid-tones because the printer needs multiple droplet sizes to render intermediate grays, and a clogged nozzle removes one droplet size from the mix. The solid fill test shows irregular stripes because coverage varies pass to pass. None of this requires a mechanic — it requires a cleaning cycle or a new cartridge. Laser printers fail primarily through their mechanics. The imaging chain — photoconductor drum, charge roller, developer roller, fuser — wears in ways no cleaning cycle can fix. Gray scale banding on a laser printer points to drum wear or toner degradation, not a clog. Solid fill banding at drum-interval spacing is a physical defect on the drum surface. Registration drift that persists after the driver’s alignment routine on a laser printer usually points to gear or belt wear; the routine compensates only within a narrow range. The fuser adds one more failure class: if bands appear in every color at the same position on the page, check the fuser rollers before touching the imaging unit. The practical consequence: on an inkjet, the cheapest fix is usually the correct one — clean, then replace. On a laser, the cheapest fix is usually the wrong one, because the parts that fail are the ones you can’t clean.
Print. Observe. Repeat.
Here is the complete workflow, about five minutes per printer:
- Print the four patterns. Run the moiré, crosshair, gray scale, and solid fill tests on plain 80 gsm office paper — the standard reference stock, because its absorbency reveals the widest range of problems.
- Examine at reading distance, then with a magnifier. Hold each page at 30 centimeters for gross defects, then check the fine patterns — crosshair intersections and moiré line pairs — with a 10x loupe.
- Record which factor fails. One line per factor: resolution, registration, density, banding. Note the gray zone of any banding and the measured spacing of any stripes.
- Apply the decision tree. Match each recorded failure to its branch and act: clean, replace, calibrate, or service.
- Re-test after every fix. Print the failing pattern again, not the whole set. Confirm the defect is gone, and re-run the full set only when you change consumables or paper. If you normally print on premium paper, run the set once on that stock as well — a paper-specific problem is still a real problem, and the fix may be a paper change rather than a printer repair.
Test First. Replace Last.
- Print the gray scale pattern first. If it bands at the drum circumference, the problem is mechanical — not consumables.
- Print the fine-line pattern. If lines blur together above 1 pt, your effective resolution is lower than the box claims.
- Print the crosshair and CMY registration pattern. If color fringing appears around fine text, run the alignment routine before replacing anything.
- Only then — if the self-test is clean but these four patterns aren’t — decide whether to clean, replace, calibrate, or call for service.
Each pattern costs one page of paper. The most expensive diagnosis in printing is replacing a cartridge that was never empty. A five-minute print session saves you the cost of a service call or a wasted ink set many times over.